> ## Documentation Index
> Fetch the complete documentation index at: https://docs.mangopay.com/llms.txt
> Use this file to discover all available pages before exploring further.

# Authentication factors

> Learn how authentication factors work on the hosted webpage

## Introduction

Mangopay is delivering SCA via a unique session on a hosted webpage. The URL for the session is returned on relevant API calls, and your platform needs to redirect the user to complete the session – see [SCA session](/guides/sca/session) for details on how to do this.

For the user, Mangopay's SCA session provides a user-friendly experience that guides them efficiently through all the necessary steps relating to all required factors.

Mangopay's hosted SCA session handles both enrollment and authentication.

<Note>
  **Note – Session lifetime 10 minutes**

  The unique SCA session is valid for 10 minutes once the `PendingUserAction.RedirectUrl` is returned by the API.

  During this time, the individual must complete all necessary steps for all factors for the session to be considered successful.

  The session is identified by the unique token in the `RedirectUrl`. So if the user refreshes the screen, or closes and re-opens the same link, then they can continue using the same session within 10 minutes.
</Note>

### Customization

By default, the SCA hosted experience is tailored to your platform by using:

* Your platform’s **trading name**, shown by **TradingName** in the screenshots below.

  To modify the trading name text, contact Mangopay <a href="https://hub.mangopay.com/" target="_blank">via the Dashboard</a>.

* Your platform’s **logo**, if provided

  To add or update the logo, send a new file on the [PUT Update a Client Logo](/api-reference/client/upload-client-logo) endpoint (for example, using <a href="https://www.postman.com/mgp-productstars/mangopay-sandbox/request/15344095-8e8c94ee-3cd6-4bdb-ad7c-b4cdadb5da41" target="_blank">Postman</a>) or contact Mangopay. To remove the logo entirely, contact Mangopay.

#### Branding colors

You can also customize two accent colors of the hosted experience to match your branding. To do so, you need to do two things:

* Define the `PrimaryThemeColour` and `PrimaryButtonColour` hex values by calling the [PUT Update a Client](/api-reference/client/update-client) endpoint (for example, using <a href="https://www.postman.com/mgp-productstars/workspace/mangopay-sandbox/request/15344095-1416a736-2269-4d3c-89d4-5ff182ca51be" target="_blank">Postman</a>). Note that you need to wait about an hour for the API colors to appear in the SCA session.
* Add the query parameters to the SCA `RedirectUrl` value to use the colors in the session when you [redirect the user](/guides/sca/session):
  * Add `&primary=true` to use the `PrimaryThemeColour`
  * Add `&cta=true` to use the `PrimaryButtonColour`

If you set only `primary=true`, then the `PrimaryThemeColour` is used for the CTA button as well as the icon accent elements.

If you set only `cta=true`, then the `PrimaryButtonColour` is used for the CTA button and the T\&Cs checkbox, but not the icon accents.

##### Example

In the screenshot below:

* The Mangopay logo is a purple PNG file uploaded via the [PUT Update a Client Logo](/api-reference/client/upload-client-logo)
* Both query parameters (`&primary=true&cta=true`) have been added to the `RedirectUrl` value before redirection (after the encoded `returnUrl`)
* The `PrimaryThemeColour` is the **purple** (#867EFF) of the icon accent elements (except the Mangopay logo)
* The `PrimaryButtonColour` is the **green** (#89E481) of the CTA button
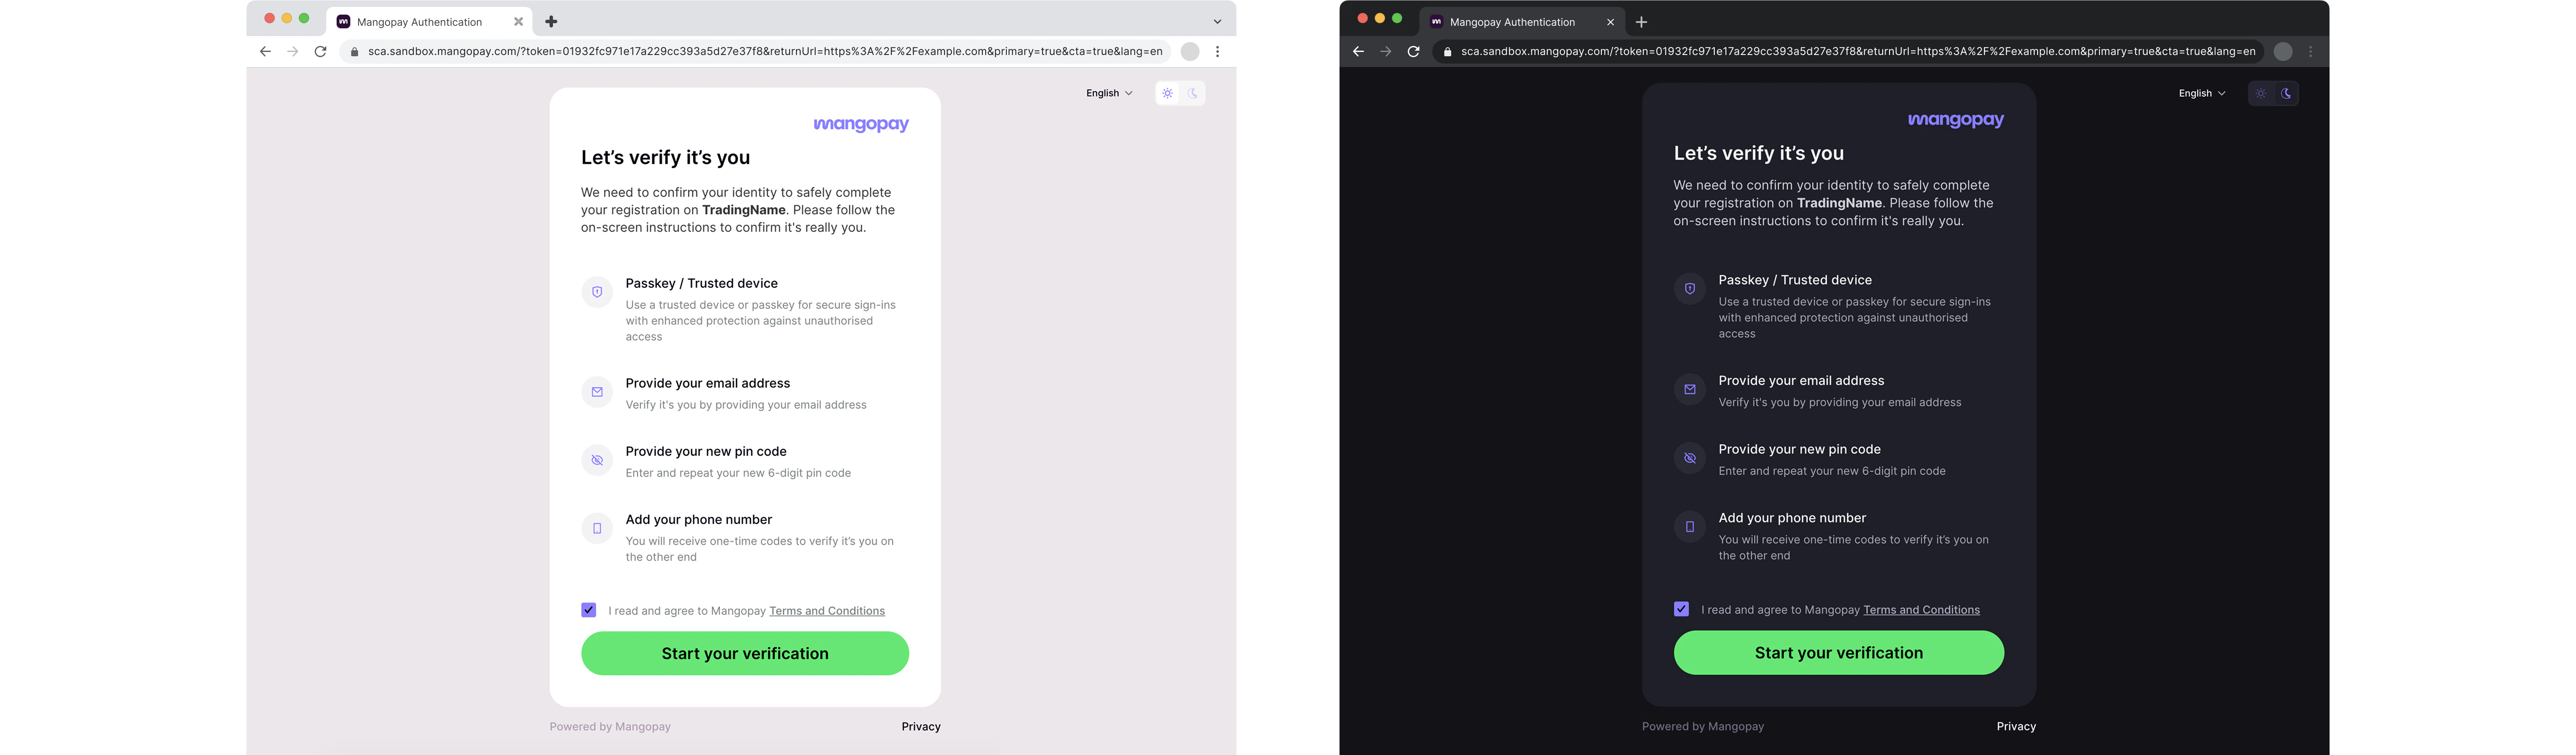
<img height="512" src="https://mintcdn.com/mangopay/uMGORlPPH-n5jhhv/images/screenshot_sca_customization.png?fit=max&auto=format&n=uMGORlPPH-n5jhhv&q=85&s=c360fdef7418b0ebc2bdfdbd8f82f1b0" data-path="images/screenshot_sca_customization.png" />

#### Theme

You can also force dark mode or light mode for the user, but note that if the user changes it in the session then their preference is stored as a local cookie and takes precedence for 30 days:

* Add `&theme=dark` for dark mode
* Add `&theme=light` for light mode

### Localization

The hosted SCA page is automatically set to the language of the user's browser if it is one of the following supported languages: Bulgarian, Dutch, English, French, German, Greek, Italian, Polish, Portuguese, Spanish, Swedish.

Regional variants for the same language resolve to the single translation supported by Mangopay: e.g. `es-419` (Latin American Spanish) resolves to `es`, `en-US` (American English) resolves to `en`.

If the browser is in a language not listed above, the session is in English by default.

You can override this and manually set the language for the session before you redirect the user – [read more](/guides/sca/session#5-set-the-session-language-optional).

If the SMS OTP factor is used, then it is also localized based on the browser language or your override.

### iframe integration

If your integration is opening the SCA session in an iframe, whether on mobile or desktop, then you need to follow the guidance below to allow the [passkey](#passkey) factor to function correctly. Otherwise, your users won't be able to benefit from this highly secure and low-friction authentication factor.

#### Allow Mangopay's SCA domains

If the SCA session is opened in an `<iframe>`, then to offer the passkey you need to give permission to Mangopay's SCA domains to generate and retrieve passkeys on the device.

This applies to both desktop and mobile flows that use an `<iframe>` to render the SCA session. On mobile, note that you can also integrate the passkey natively as [described below](#passkey-on-mobile).

In your `<iframe>` element, add the `allow` property to give the following permissions to Mangopay's SCA domains.

Mangopay's hosted SCA domains:

* `https://sca.sandbox.mangopay.com` – Sandbox for testing and integration
* `https://sca.mangopay.com` – Production

The permissions required by the SCA session:

* `publickey-credentials-create` – To <a href="https://developer.mozilla.org/en-US/docs/Web/HTTP/Reference/Headers/Permissions-Policy/publickey-credentials-create" target="_blank">create a passkey</a> on the device
* `publickey-credentials-get` – To <a href="https://developer.mozilla.org/en-US/docs/Web/HTTP/Reference/Headers/Permissions-Policy/publickey-credentials-get" target="_blank">retrieve a passkey</a> from the device
* `otp-credentials` (optionally, for [OTP factor](#otp)) – To enable the <a href="https://developer.mozilla.org/en-US/docs/Web/HTTP/Reference/Headers/Permissions-Policy/otp-credentials" target="_blank">auto-filling of an OTP code</a> received on the device

Add Mangopay's domain origins for each permission in the `allow` property as shown below. If you're using a single environment with both the Sandbox and Production versions of Mangopay's SCA hosted experience, then you can list both domain origins separated by a space for each permission directive.

<Tabs>
  <Tab title="Sandbox SCA">
    ```html theme={null}
    <iframe 
      allow="publickey-credentials-get https://sca.sandbox.mangopay.com/;
      publickey-credentials-create https://sca.sandbox.mangopay.com/;
      otp-credentials https://sca.sandbox.mangopay.com/;">
    </iframe>
    ```
  </Tab>

  <Tab title="Production SCA">
    ```html theme={null}
    <iframe 
      allow="publickey-credentials-get https://sca.mangopay.com/;
      publickey-credentials-create https://sca.mangopay.com/;
      otp-credentials https://sca.mangopay.com/;">
    </iframe>
    ```
  </Tab>

  <Tab title="Both">
    ```html theme={null}
    <iframe 
      allow="publickey-credentials-get https://sca.mangopay.com/ https://sca.sandbox.mangopay.com/;
      publickey-credentials-create https://sca.mangopay.com/ https://sca.sandbox.mangopay.com/;
      otp-credentials https://sca.mangopay.com/ https://sca.sandbox.mangopay.com/;">
    </iframe>
    ```
  </Tab>
</Tabs>

#### Share and verify your domains with Mangopay

By default, the SCA session detects the `<iframe>` and skips the **passkey** for security reasons, which means your users can't benefit from this highly secure and seamless authentication factor.

To offer the passkey in an iframe in full security, Mangopay needs to add your domains to an allowlist. This ensures that the `<iframe>` can only be rendered in your specified domains, which prevents an unauthorized third-party from embedding the SCA session somewhere else.

To share and verify your domains with Mangopay:

1. Ensure you have integrated the iframe's `allow` property [as described above](#allow-mangopay%E2%80%99s-sca-domains) to give permission for the SCA session to load the passkey.
2. Contact Mangopay <a href="https://hub.mangopay.com/" target="_blank">via the Dashboard</a> to share the domain origin (e.g., `https://www.example.com`) of your **testing** integration where the `<iframe>` is loaded.
3. Mangopay will add your testing domain to an allowlist so you can test the passkey in your testing environment using the Sandbox SCA session. Mangopay will also ensure your Sandbox integration is working as expected.
4. Once both your platform and Mangopay validate the testing integration, you can share your **production** domain for Mangopay to allow and verify in the same way.

### Mobile breakpoint

The breakpoint between mobile and desktop is 600px, so to ensure the desktop version is rendered you should set that as the minimum width. The height is variable depending on the content in both the options implemented, the screens for each factor, and the localization.

## Welcome screen

On the `RedirectUrl`, the user first sees a Mangopay-branded welcome screen explaining the steps that are required from them.

#### Welcome screen on enrollment

Below is an example of the SCA welcome screen for an Owner user enrolling at user creation:

<img height="512" src="https://mintcdn.com/mangopay/ga_wyIp8pWx6MTlP/images/screenshot_sca_welcome_enroll.png?fit=max&auto=format&n=ga_wyIp8pWx6MTlP&q=85&s=3f5c8c8e560e50b1b46ca18de8a0d0f7" data-path="images/screenshot_sca_welcome_enroll.png" />

#### Welcome screen on authentication

Below is an example of the SCA welcome screen for a on Owner authenticating a transfer request above 30 EUR:

<img height="512" src="https://mintcdn.com/mangopay/ga_wyIp8pWx6MTlP/images/screenshot_sca_welcome_transfer_auth.png?fit=max&auto=format&n=ga_wyIp8pWx6MTlP&q=85&s=3c90b5b2c3afac7770353f5604829389" data-path="images/screenshot_sca_welcome_transfer_auth.png" />

The wording is adapted for both enrollment and authentication depending on the scenario. The platform trading name is always shown, along with:

* For a [transfer](/guides/sca/transfers) request, the transfer currency and amount
* For [recipient](/guides/sca/recipients) bank account registration, the IBAN or local account number
* For [wallet](/guides/sca/wallets) access, a mention of access to personal account information

See what conditions trigger SCA in Sandbox for more support with testing each scenario: [users](/guides/sca/users#sca-triggers-in-sandbox), [recipients](/guides/sca/recipients#sca-triggers-in-sandbox), [transfers](/guides/sca/transfers#sca-triggers-in-sandbox), and [wallet access](/guides/sca/wallets#sca-triggers-in-sandbox).

## Email confirmation behavioral biometrics

Thanks to its expertise in AI-powered fraud prevention, Mangopay is developing a model to use behavioral biometrics to analyze the way the user types their email address.

In it's current form, the step is not a factor. Rather, it allows Mangopay to collect anonymized behavioral data on the user's keyboard or touchscreen movements. This is made possible thanks to Mangopay's fraud prevention profiler integrated in the hosted SCA session.

In the coming months, Mangopay plans to validate the email confirmation step as an SCA inherence factor. Once validated, it will enable the user to authenticate using only email confirmation and PIN (and not OTP SMS). The OTP SMS factor would be used in case the model returns an uncertain or failed assessment.

<Note>
  **Note – Email address requested to build behavioral profile**

  Mangopay's hosted SCA session asks the user to enter their email address during both enrollment and authentication.

  This enables Mangopay's profiler to build a behavioral biometrics model that in future will make it possible to use the email entry as a valid SCA factor.

  For Legal Soletrader users, the address used is the `LegalRepresentative.Email` (and not the `Email`). For Natural users, the address used is the `Email`.
</Note>

Mangopay processes behavioral biometric data captured during SCA sessions solely to fulfill its authentication obligations as a regulated financial institution.

<img height="512" src="https://mintcdn.com/mangopay/ga_wyIp8pWx6MTlP/images/screenshot_sca_email.png?fit=max&auto=format&n=ga_wyIp8pWx6MTlP&q=85&s=735f82378e76617238e30810290d5e68" data-path="images/screenshot_sca_email.png" />

## Factors

Mangopay provides the following authentication factors.

<table>
  <thead>
    <tr>
      <th class="header">Factor</th>
      <th class="header">Required</th>
      <th class="header">Type</th>
      <th class="header">Description</th>
    </tr>
  </thead>

  <tbody>
    <tr>
      <td class="table-content">
        Trusted device using WebAuthn [passkey](#passkey)
      </td>

      <td class="table-content">
        Yes, if supported by device
      </td>

      <td class="table-content">
        Possession (of device) and inherence (if biometrics) or knowledge (if password or passcode)
      </td>

      <td class="table-content">
        The individual uses the native authentication features (biometrics, password, passcode) of their device that they set up during enrollment.
      </td>
    </tr>

    <tr>
      <td class="table-content">
        [Personal identification number (PIN)](#pin)
      </td>

      <td class="table-content">
        Yes, always
      </td>

      <td class="table-content">
        Knowledge
      </td>

      <td class="table-content">
        The individual enters a 6-digit code they defined during enrollment.
      </td>
    </tr>

    <tr>
      <td class="table-content">
        Phone-based [one-time passcode (OTP)](#otp)
      </td>

      <td class="table-content">
        Yes, if passkey not available
      </td>

      <td class="table-content">
        Possession
      </td>

      <td class="table-content">
        The individual receives a 6-digit OTP via SMS to the phone number provided during enrollment.
      </td>
    </tr>
  </tbody>
</table>

#### Logic governing trusted devices

Defining a trusted device using a WebAuthn passkey is attempted if the user's device supports the technology.

If the user enrolls a trusted device, then only the PIN is enrolled as the second factor.

If the user authenticates using a trusted device, then the passkey alone satisfies SCA because it is a combination of two factors.

If at either point the passkey factor is not successful, then the PIN and OTP are both used. Skipping the passkey is possible during authentication even if a device is already enrolled because the user may not be using their trusted device.

### Passkey

The passkey factor relies on the Web Authentication, or WebAuthn, standard to create a set of two passkeys (or credentials):

* A public key that is not secret and is stored on the Mangopay server
* A private key that is secret and is stored on the user's device

The private key is accessed using the device's authentication features: for example, a password or fingerprint on a laptop; or a passcode, fingerprint, or face on a smartphone.

Because WebAuthn doesn't rely on a new password, it is more resistant to phishing and data breaches. It has wide adoption on web browsers and mobile devices.

If you are opening the SCA session in an `<iframe>`, see the iframe [integration section](#iframe-integration) above to ensure the passkey can operate correctly and securely.

#### Passkey on mobile

For mobile app integrations, passkeys are not supported if the `RedirectUrl` is opened in a webview (and the factor enrollment or authentication will fail). The factor must be integrated natively. If it is not, then the passkey remains optional but will fail if the user attempts to use it.

See the dedicated guides for details native integration of the passkey:

<CardGroup cols={2}>
  <Card title="iOS" href="/guides/sca/factors/passkey-ios">
    Integrate the passkey factor in iOS apps
  </Card>

  <Card title="Android" href="/guides/sca/factors/passkey-android">
    Integrate the passkey factor in Android apps
  </Card>
</CardGroup>

#### Passkey device enrollment

To enroll, the user:

1. Selects where to store the passkey from the options proposed by their device
2. Authenticates using their device authentication feature (biometrics, password, passcode)

Below is an example of the enrollment process using Chrome on MacOS, a passkey stored in a Google Chrome profile, and the laptop password.

<img height="512" src="https://mintcdn.com/mangopay/-Q4qwhrSfAtJ741Y/images/screenshot_sca_passkey_enroll.png?fit=max&auto=format&n=-Q4qwhrSfAtJ741Y&q=85&s=0a1b81893a974526c1961805faacd53c" data-path="images/screenshot_sca_passkey_enroll.png" />

#### Passkey device authentication

During authentication:

1. Indicates that they are using their trusted device
2. Selects the passkey to use
3. Authenticates using their device authentication feature (biometrics, password, passcode)

Below is an example of the authentication process using Chrome on MacOS, a passkey stored in a Google Chrome profile, and the laptop password.

<img height="512" src="https://mintcdn.com/mangopay/-Q4qwhrSfAtJ741Y/images/screenshot_sca_passkey_auth.png?fit=max&auto=format&n=-Q4qwhrSfAtJ741Y&q=85&s=e902b8eb78e4c27cfb6b2aa880a23222" data-path="images/screenshot_sca_passkey_auth.png" />

### PIN

The PIN factor relies on a 6-digit code defined and memorized by the individual, which they enter during the session.

#### PIN enrollment

To enroll, the individual:

1. Defines and confirms a 6-digit PIN
2. Enters their PIN defined previously

<img height="512" src="https://mintcdn.com/mangopay/ga_wyIp8pWx6MTlP/images/screenshot_sca_pin_enroll.png?fit=max&auto=format&n=ga_wyIp8pWx6MTlP&q=85&s=27740e3ccce0e2a43d8763481f3faae1" data-path="images/screenshot_sca_pin_enroll.png" />

#### PIN authentication

To authenticate, the individual:

1. Enters their PIN defined previously

<img height="512" src="https://mintcdn.com/mangopay/ga_wyIp8pWx6MTlP/images/screenshot_sca_pin_auth.png?fit=max&auto=format&n=ga_wyIp8pWx6MTlP&q=85&s=5eeaeb15811ff238e0e04c0348154a85" data-path="images/screenshot_sca_pin_auth.png" />

### OTP

The OTP factor relies on a temporary 6-digit code sent to the individual's phone, which they can enter during the session.

If your integration is opening the SCA in an `<iframe>`, you may wish to give the device permission to auto-fill the OTP code – see the [iframe integration](#iframe-integration) section above for details.

<Note>
  **Note – OTP lifetime 5 minutes**

  While the SCA session is valid for 10 minutes, once the user clicks the button to send the SMS, the code is valid for 5 minutes.

  The user can request a new code after 30 seconds, even if the first one hasn't expired.
</Note>

#### OTP enrollment

To enroll, the individual:

1. Enters their mobile phone number (or confirms the pre-populated number, if `PhoneNumber` was present in the API call to create or update the user)
2. Enters the 6-digit code received by SMS

<img height="512" src="https://mintcdn.com/mangopay/ga_wyIp8pWx6MTlP/images/screenshot_sca_otp_enroll.png?fit=max&auto=format&n=ga_wyIp8pWx6MTlP&q=85&s=56c4329cc83da777c9b737d22837bf8f" data-path="images/screenshot_sca_otp_enroll.png" />

#### OTP authentication

To authenticate, the individual:

1. Enters the 6-digit code received by SMS

<img height="512" src="https://mintcdn.com/mangopay/ga_wyIp8pWx6MTlP/images/screenshot_sca_otp_auth.png?fit=max&auto=format&n=ga_wyIp8pWx6MTlP&q=85&s=1c13efd3748f8db9b258a2c7ad88aa14" data-path="images/screenshot_sca_otp_auth.png" />

#### SMS wording

The text of the SMS is adapted to the action being performed:

> Use `123456` to confirm `ActionName` on `PlatformTradingName`.

The possible `ActionName` wordings are:

* `your registration`
* `the registration of a bank account`
* `the transfer`
* `the access to your wallet details`

The SMS is localized depending on the browser language or the value you define when you redirect the user – [read more](/guides/sca/session).

#### Test data

In Sandbox, you can use the phone number `0611111111` and `FR` (`+33611111111`) with the passcode **702100** to simulate a successful flow. You can also send this data in the `PhoneNumber` (or `LegalRepresentative.PhoneNumber`) to pre-populate the field.

You can also test by using a real phone number to receive the SMS OTP.

#### Handling phone number data

Mangopay's SCA session allows the individual to provide their phone number directly to Mangopay. This data is not shared with your platform for privacy reasons. The same phone number can be used with more than one user account.

Your platform can send the user's phone number to Mangopay via the API – in the `PhoneNumber` parameter of the Natural User or the `LegalRepresentative.PhoneNumber` of the Legal User.

If the phone number data is present in the user object, then the field is pre-populated for the user to confirm or modify.

<Note>
  **Note – SCA session phone number doesn't update API**

  The phone number provided or confirmed by the user during the SCA session is not subsequently updated in the User API object.

  Changing the `PhoneNumber` or `LegalRepresentative.PhoneNumber` data in the API object triggers SCA re-enrollment ([read more](/guides/sca/users#re-enroll-an-enrolled-owner)).
</Note>

## Factor orchestration

The SCA session is orchestrated to optimize the enrollment and authentication experience for users.

The session meets SCA requirements and is highly secure, including if the user chooses to re-enroll a factor during the session.

The diagrams below describe the different possible flows and all options available to the user.

<Note>
  **Note – Email confirmation**

  Email confirmation is required in all flows, with the exception of **authentication** via passkey (email is still required during passkey **enrollment**).

  Once the email confirmation is validated as a factor, the enrollment and authentication flows will modify to adopt it.

  The email address used is the `Email` for Natural users and the `LegalRepresentative.Email` for legal users. The address cannot be changed by the user during the session; it can only be changed via API, which triggers the re-enrollment flow below.
</Note>

### Initial enrollment

When the user is redirect to a Mangopay SCA session for the first time:

* Mangopay analyzes their device to see if it supports WebAuthn passkey. If it does, then the factor enrollment is attempted.
* If the passkey is enrolled successfully (no error occurs), then the PIN and email are used as a backup (and not SMS).

Mangopay has integrated the passkey to be a combined possession (of the device) and inherence or knowledge type (depending on the device's authentication). Furthermore, the email confirmation step is not required on authentication (it is still required for enrollment or re-enrollment).

The WebAuthn passkey represents one of the most secure web-based authentication methods available, being resistant to fraudulent attacks (such as phishing) as well as technical issues (like SMS deliverability). The technology also provides an excellent user experience.

<div className="block dark:hidden">
  ```mermaid theme={null}
  %%{
    init: {
      'theme': 'base',
      'themeVariables': {
        'primaryColor': '#FFFFFF',
        'primaryTextColor': '#2D0F37',
        'primaryBorderColor': '#2D0F37',
        'lineColor': '#2D0F37',
        'secondaryColor': '#FFFFFF',
        'tertiaryColor': '#FFFFFF',
        'fontSize': '32px',
        'fontFamily': 'Inter'
      }
    }
  }%%
  flowchart LR
      n6["Passkey factor attempted"]  ==> n7(["User enrolls passkey?"])
      n8["User confirms email"]  ==> n11["User enrolls  PIN"]
      n14(["START"])  ==> n4(["Device supports WebAuth?"])
      n12["User confirms email"]  ==> n15["User enrolls PIN"]
      n15  ==> n16["User enrolls  OTP SMS"]
      n16  ==> n13(["END"])
      n4  == No  ==> n12
      n4  == Yes  ==> n6
      n7  == No  ==> n12
      n11  ==> n13
      n7  == Yes  ==> n8
      n6@{ shape: rect}
      n8@{ shape: rect}
      style n4 stroke-width:3.5px
      style n6 stroke-width:3.5px
      style n7 stroke-width:3.5px
      style n8 stroke-width:3.5px
      style n11 stroke-width:3.5px
      style n12 stroke-width:3.5px
      style n13 stroke-width:3.5px
      style n14 stroke-width:3.5px
      style n15 stroke-width:3.5px
      style n16 stroke-width:3.5px
  ```
</div>

<div className="hidden dark:block">
  ```mermaid theme={null}
  %%{
    init: {
      'theme': 'base',
      'themeVariables': {
        'primaryColor': "#090D0D",
        'primaryTextColor': "#FFFFFF",
        'primaryBorderColor': "#FFFFFF",
        'lineColor': "#FFFFFF",
        'secondaryColor': "#090D0D",
        'tertiaryColor': "#090D0D",
        'fontSize': '32px',
        'fontFamily': 'Inter'
      }
    }
  }%%
  flowchart LR
      n6["Passkey factor attempted"]  ==> n7(["User enrolls passkey?"])
      n8["User confirms email"]  ==> n11["User enrolls  PIN"]
      n14(["START"])  ==> n4(["Device supports WebAuth?"])
      n12["User confirms email"]  ==> n15["User enrolls PIN"]
      n15  ==> n16["User enrolls  OTP SMS"]
      n16  ==> n13(["END"])
      n4  == No  ==> n12
      n4  == Yes  ==> n6
      n7  == No  ==> n12
      n11  ==> n13
      n7  == Yes  ==> n8
      n6@{ shape: rect}
      n8@{ shape: rect}
      style n4 stroke-width:3.5px
      style n6 stroke-width:3.5px
      style n7 stroke-width:3.5px
      style n8 stroke-width:3.5px
      style n11 stroke-width:3.5px
      style n12 stroke-width:3.5px
      style n13 stroke-width:3.5px
      style n14 stroke-width:3.5px
      style n15 stroke-width:3.5px
      style n16 stroke-width:3.5px
  ```
</div>

### Authentication

When the user is prompted to authenticate:

* The passkey is the only factor that can be skipped (even if it is enrolled, as the user may not be on their enrolled device). If it is enrolled and then skipped, then the PIN is used.
* The user can opt to change re-enroll either the PIN or the OTP SMS during an authentication session. The other is used to authenticate the one that is changed.
* The user cannot modify their email address (only possible via API, see below).

<div className="block dark:hidden">
  ```mermaid theme={null}
  %%{
    init: {
      'theme': 'base',
      'themeVariables': {
        'primaryColor': '#FFFFFF',
        'primaryTextColor': '#2D0F37',
        'primaryBorderColor': '#2D0F37',
        'lineColor': '#2D0F37',
        'secondaryColor': '#FFFFFF',
        'tertiaryColor': '#FFFFFF',
        'fontSize': '32px',
        'fontFamily': 'Inter'
      }
    }
  }%%
  flowchart LR
      n6["Passkey factor attempted"]  ==> n7(["User auths  passkey?"])
      n14(["START"])  ==> n4(["Passkey enrolled?"])
      n4  == Yes  ===> n6
      n4  == No  ===> n17["User confirms  email"]
      n7  == YES  ===> n13(["SUCCESS"])
      n17  ==> n18(["User wants to change PIN?"])
      n18  == No  ==> n22["User auths  existing PIN"]
      n19(["Email step successful?"])  == Yes  ===> n13
      n20["User auths existing OTP SMS"]  ==> n13
      n22  ==> n19
      n18  == Yes  ===> n23["User enrolls  new PIN"]
      n23  ==> n20
      n7  == No  ==> n17
      n19  == No  ==> n28(["User wants to change phone number?"])
      n28  == Yes  ==> n29["User enrolls new OTP SMS"]
      n29  ==> n13
      n28  == No  ==> n20
      n6@{ shape: rect}
      style n4 stroke-width:3.5px
      style n6 stroke-width:3.5px
      style n7 stroke-width:3.5px
      style n13 stroke-width:3.5px
      style n14 stroke-width:3.5px
      style n17 stroke-width:3.5px
      style n18 stroke-width:3.5px
      style n19 stroke-width:3.5px
      style n20 stroke-width:3.5px
      style n22 stroke-width:3.5px
      style n23 stroke-width:3.5px
      style n28 stroke-width:3.5px
      style n29 stroke-width:3.5px
  ```
</div>

<div className="hidden dark:block">
  ```mermaid theme={null}
  %%{
    init: {
      'theme': 'base',
      'themeVariables': {
        'primaryColor': "#090D0D",
        'primaryTextColor': "#FFFFFF",
        'primaryBorderColor': "#FFFFFF",
        'lineColor': "#FFFFFF",
        'secondaryColor': "#090D0D",
        'tertiaryColor': "#090D0D",
        'fontSize': '32px',
        'fontFamily': 'Inter'
      }
    }
  }%%
  flowchart LR
      n6["Passkey factor attempted"]  ==> n7(["User auths  passkey?"])
      n14(["START"])  ==> n4(["Passkey enrolled?"])
      n4  == Yes  ===> n6
      n4  == No  ===> n17["User confirms  email"]
      n7  == YES  ===> n13(["SUCCESS"])
      n17  ==> n18(["User wants to change PIN?"])
      n18  == No  ==> n22["User auths  existing PIN"]
      n19(["Email step successful?"])  == Yes  ===> n13
      n20["User auths existing OTP SMS"]  ==> n13
      n22  ==> n19
      n18  == Yes  ===> n23["User enrolls  new PIN"]
      n23  ==> n20
      n7  == No  ==> n17
      n19  == No  ==> n28(["User wants to change phone number?"])
      n28  == Yes  ==> n29["User enrolls new OTP SMS"]
      n29  ==> n13
      n28  == No  ==> n20
      n6@{ shape: rect}
      style n4 stroke-width:3.5px
      style n6 stroke-width:3.5px
      style n7 stroke-width:3.5px
      style n13 stroke-width:3.5px
      style n14 stroke-width:3.5px
      style n17 stroke-width:3.5px
      style n18 stroke-width:3.5px
      style n19 stroke-width:3.5px
      style n20 stroke-width:3.5px
      style n22 stroke-width:3.5px
      style n23 stroke-width:3.5px
      style n28 stroke-width:3.5px
      style n29 stroke-width:3.5px
  ```
</div>

### Re-enrollment via API

The email cannot be changed by the user during the SCA session; it can only be changed via the API. The phone number can be changed by the user during the SCA session and if it is, then the data is **not** updated in the API User object.

The diagram below shows the re-enrollment flow in the case of phone number or email change via API (the authentication flow above shows phone number change in the session).

<div className="block dark:hidden">
  ```mermaid theme={null}
  %%{
    init: {
      'theme': 'base',
      'themeVariables': {
        'primaryColor': '#FFFFFF',
        'primaryTextColor': '#2D0F37',
        'primaryBorderColor': '#2D0F37',
        'lineColor': '#2D0F37',
        'secondaryColor': '#FFFFFF',
        'tertiaryColor': '#FFFFFF',
        'fontSize': '32px',
        'fontFamily': 'Inter'
      }
    }
  }%%
  flowchart LR
      n6["Passkey factor attempted"] ==> n7(["User auths passkey?"])
      n14(["START"]) ==> n30["PhoneNumber or Email modified via API"]
      n4(["Passkey enrolled?"]) == Yes ===> n6
      n4 == No ===> n17["User confirms email"]
      n22["User auths PIN"] ==> n32["User auths (new or unmodified) OTP SMS"]
      n30 ==> n4
      n7 == Yes ==> n31["User confirms email"]
      n17 ==> n22
      n32 ==> n13(["SUCCESS"])
      n7 == No ==> n17
      n31 ==> n33(["Which data updated?"])
      n33 == Email only ==> n13
      n33 == Phone number (with or without email) ==> n34["User auths new OTP SMS"]
      n34 ==> n13
      n6@{ shape: rect}
      n30@{ shape: rect}
      style n4 stroke-width:3.5px
      style n6 stroke-width:3.5px
      style n7 stroke-width:3.5px
      style n13 stroke-width:3.5px
      style n14 stroke-width:3.5px
      style n17 stroke-width:3.5px
      style n22 stroke-width:3.5px
      style n30 stroke-width:3.5px
      style n31 stroke-width:3.5px
      style n32 stroke-width:3.5px
      style n33 stroke-width:3.5px
      style n34 stroke-width:3.5px
  ```
</div>

<div className="hidden dark:block">
  ```mermaid theme={null}
  %%{
    init: {
      'theme': 'base',
      'themeVariables': {
        'primaryColor': "#090D0D",
        'primaryTextColor': "#FFFFFF",
        'primaryBorderColor': "#FFFFFF",
        'lineColor': "#FFFFFF",
        'secondaryColor': "#090D0D",
        'tertiaryColor': "#090D0D",
        'fontSize': '32px',
        'fontFamily': 'Inter'
      }
    }
  }%%
  flowchart LR
      n6["Passkey factor attempted"] ==> n7(["User auths passkey?"])
      n14(["START"]) ==> n30["PhoneNumber or Email modified via API"]
      n4(["Passkey enrolled?"]) == Yes ===> n6
      n4 == No ===> n17["User confirms email"]
      n22["User auths PIN"] ==> n32["User auths (new or unmodified) OTP SMS"]
      n30 ==> n4
      n7 == Yes ==> n31["User confirms email"]
      n17 ==> n22
      n32 ==> n13(["SUCCESS"])
      n7 == No ==> n17
      n31 ==> n33(["Which data updated?"])
      n33 == Email only ==> n13
      n33 == Phone number (with or without email) ==> n34["User auths new OTP SMS"]
      n34 ==> n13
      n6@{ shape: rect}
      n30@{ shape: rect}
      style n4 stroke-width:3.5px
      style n6 stroke-width:3.5px
      style n7 stroke-width:3.5px
      style n13 stroke-width:3.5px
      style n14 stroke-width:3.5px
      style n17 stroke-width:3.5px
      style n22 stroke-width:3.5px
      style n30 stroke-width:3.5px
      style n31 stroke-width:3.5px
      style n32 stroke-width:3.5px
      style n33 stroke-width:3.5px
      style n34 stroke-width:3.5px
  ```
</div>

## Webhooks

To assist with your SCA integration, your platform can [set up webhooks](/webhooks) for:

* [Overall SCA enrollment](/webhooks/event-types#mangopay-sca-enrollment)
* The [verification of the email and/or phone number data](/webhooks/event-types#mangopay-sca-enrollment) when it is added or changed and then an SCA session is completed successfully

## Related resources

<CardGroup cols={2}>
  <Card title="Guide" href="/guides/sca/session">
    Read about how to redirect a user for the SCA session
  </Card>
</CardGroup>
